
Building a no-nonsense content approval workflow
The quick, no-nonsense guide to building painless and efficient content approval workflows.

Content marketing is a critical engine of growth in the digital age. It’s arguably the single most effective means of growing your brand presence, building credibility or trust by establishing yourself as an authority, fueling audience engagement, and driving sales.
Don’t believe us? Here are some numbers to demonstrate the value of content marketing:
- Content marketing generates 3 times more leads than outbound marketing, sees 6 times higher conversion rates, and boosts traffic by up to 7.8 times — plus it costs around 67% less than outbound marketing initiatives, according to the Content Marketing Institute.
- Envisage Digital estimates that 4.4 million new blog posts are published every day in 2022 (across all platforms). Other estimates put this number at 6 million and 7.5 million posts per day!
- Organizations that regularly publish blogs get 55% more web visitors, receive 97% more inbound links, and get 434% more pages indexed than companies that don’t publish frequently.
With this in mind, it shouldn’t come as a surprise that the vast majority of marketers today use content marketing — 91% of B2B marketers and 86% of B2C marketers.
Content management is an unavoidable part of consistently getting high-quality content published. And yet, so many organizations are getting it wrong by underestimating the importance of having an effective content approval workflow.
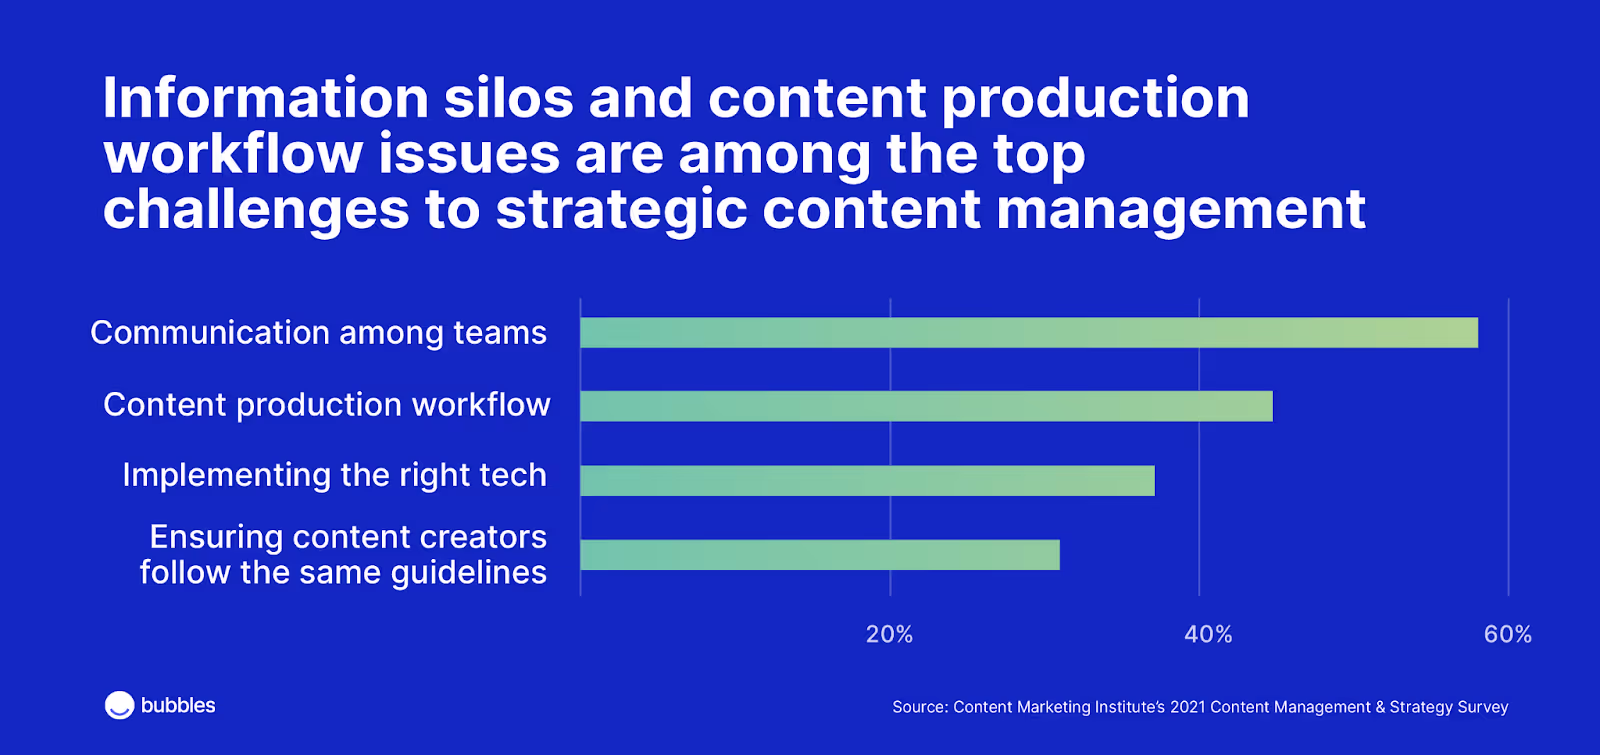
Some of the top content-related challenges reported by respondents in a 2021 Content Marketing Institute study, included:
- Communication among teams (58%)
- Content production workflow (45% — up from 27% the previous year)
- Implementing the right technologies (38%)
- Ensuring content creators across the organization follow the same guidelines (32%)
And yet, only 59% of respondents say that their organization has formal content development workflow processes in place.
This means that most of these organizations are making it up as they go. Which is… not great for productivity, efficiency, or content quality and consistency. Not to mention actual results.
For content marketing to be effective, you need to be able to measure how your content is performing against your marketing strategy, but it’s hard to be strategic when you’re being reactive instead of proactive.
So it’s hardly surprising that 68% of respondents in the same study named “lack of processes” as the top reason their organization doesn’t take a strategic approach to managing content.
Whether you’re producing content using your in-house marketing team or outsourcing to freelancers or agencies, having robust content approval workflows in place is crucial to consistently producing high-quality content assets.
Keep reading to learn
- What a content approval workflow is,
- Why having content approval workflows is important,
- How to build a no-bullsh*t content approval workflow in 5 steps, and
- How using bubbles can streamline your feedback and approval processes.
What is a content approval workflow?
Simply put, a content approval workflow is a documented and repeatable process for reviewing content to ensure it meets the organization’s quality standards.
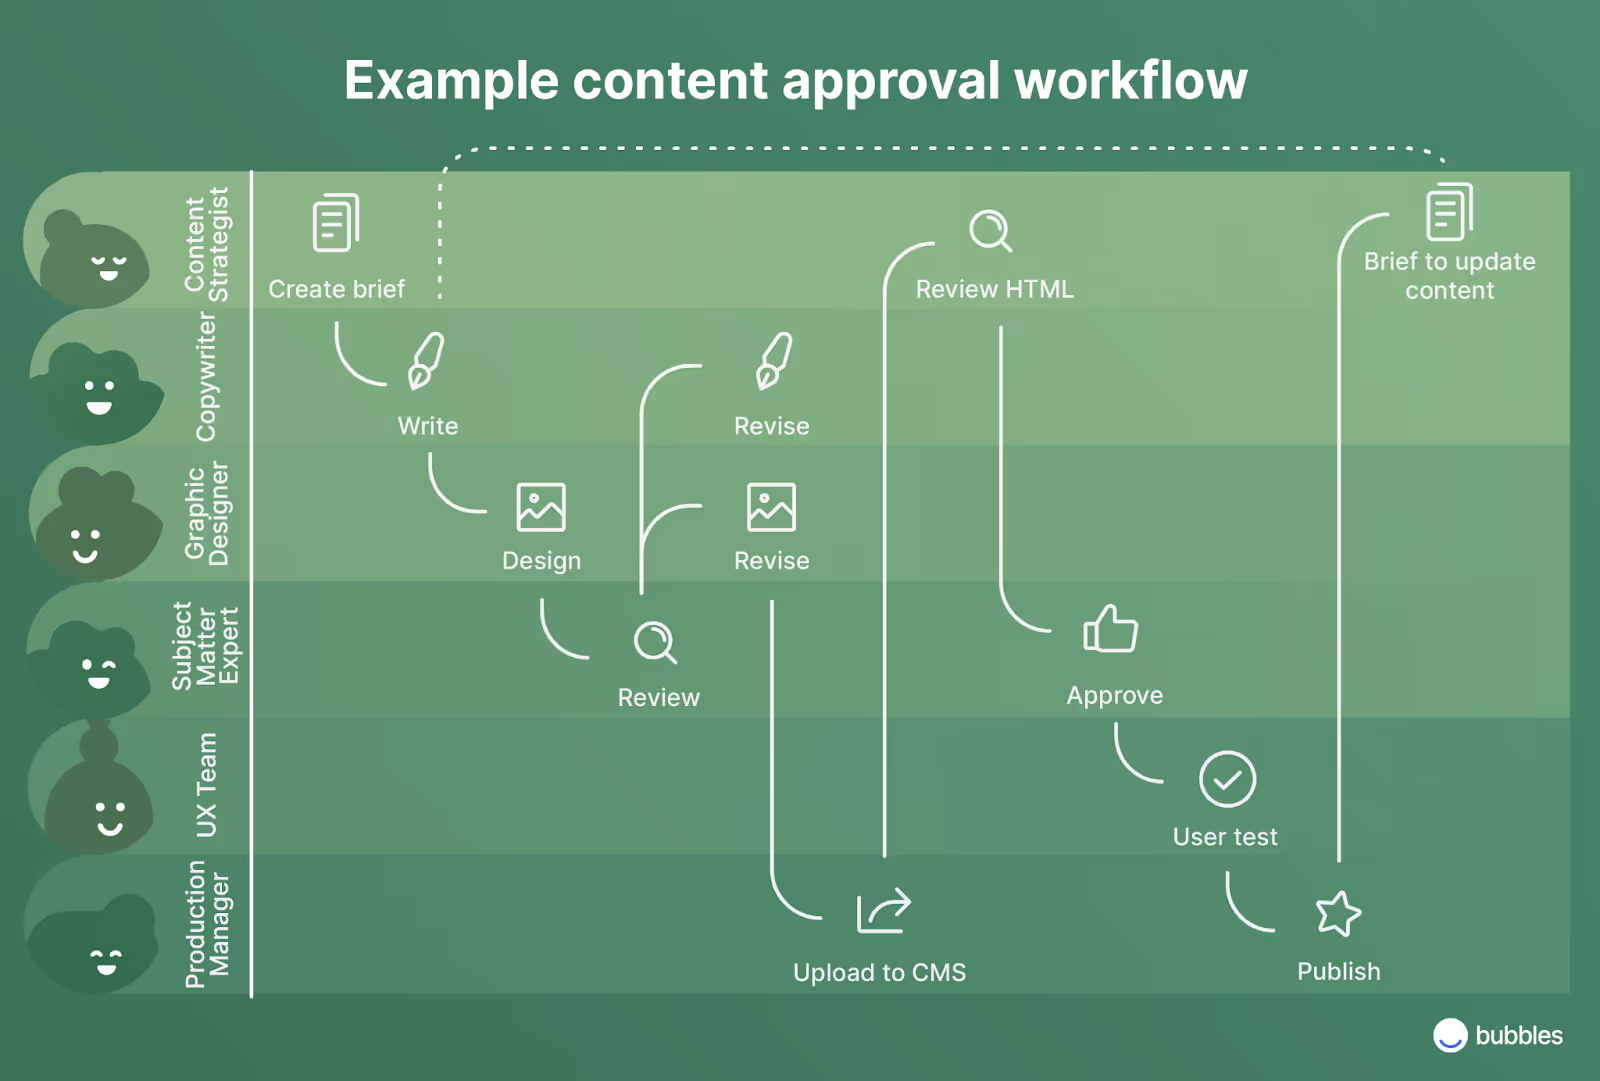
A content approval workflow outlines not only at which stage(s) of content production the content is reviewed but also which roles are responsible for each step of the content production and review process.
An effective content approval workflow involves more than simply proofing or editing the content just before it gets published.
Instead, content quality assurance starts at the beginning of the content production cycle, with a strategic content calendar, detailed briefs, standard operating procedures, clearly-defined roles and responsibilities, and robust resources and guidelines documenting important information like brand messaging and style preferences.
Why is having a content approval workflow important?
When you don’t have a solid content approval workflow in place, it’s hard to consistently produce content that’s on-brand and lives up to your quality standards.
Without standardized processes, it can be difficult to keep track of a large number of content projects, which means content that hasn’t been approved can slip through the cracks and get published prematurely.
On the other hand, without proper communication, it’s easy to get mired in half-finished, half-forgotten pieces of content — or for content to hit approval bottlenecks that cause delays.
When tasks, roles, and content handover procedures aren’t clearly defined, content team members might be uncertain about their responsibilities, when it’s their “turn” in the content development process, or what to do (or who to talk to) if they run into obstacles.
Having a clearly defined and standardized content production workflow allows you to:
- Break down your content creation workflow into clearly defined individual tasks
- Create realistic timelines and due dates for each stage
- Define at which stage(s) each content asset needs to be approved (e.g. first draft, after edits, pre-upload)
- Keep track of who is responsible for each stage of content development
- Track which stage each piece of content is currently in
- Identify and address obstacles early on
- Ensure that each piece of content is of a high quality
- Keep your brand identity consistent
- Remove bottlenecks and reduce delays
- Improve communication and working relationships
- Collaborate with freelancers and agencies with greater ease
TLDR: Standardized content workflows or standard operating procedures (SOPs) mean your content production engine runs like a well-oiled content machine.
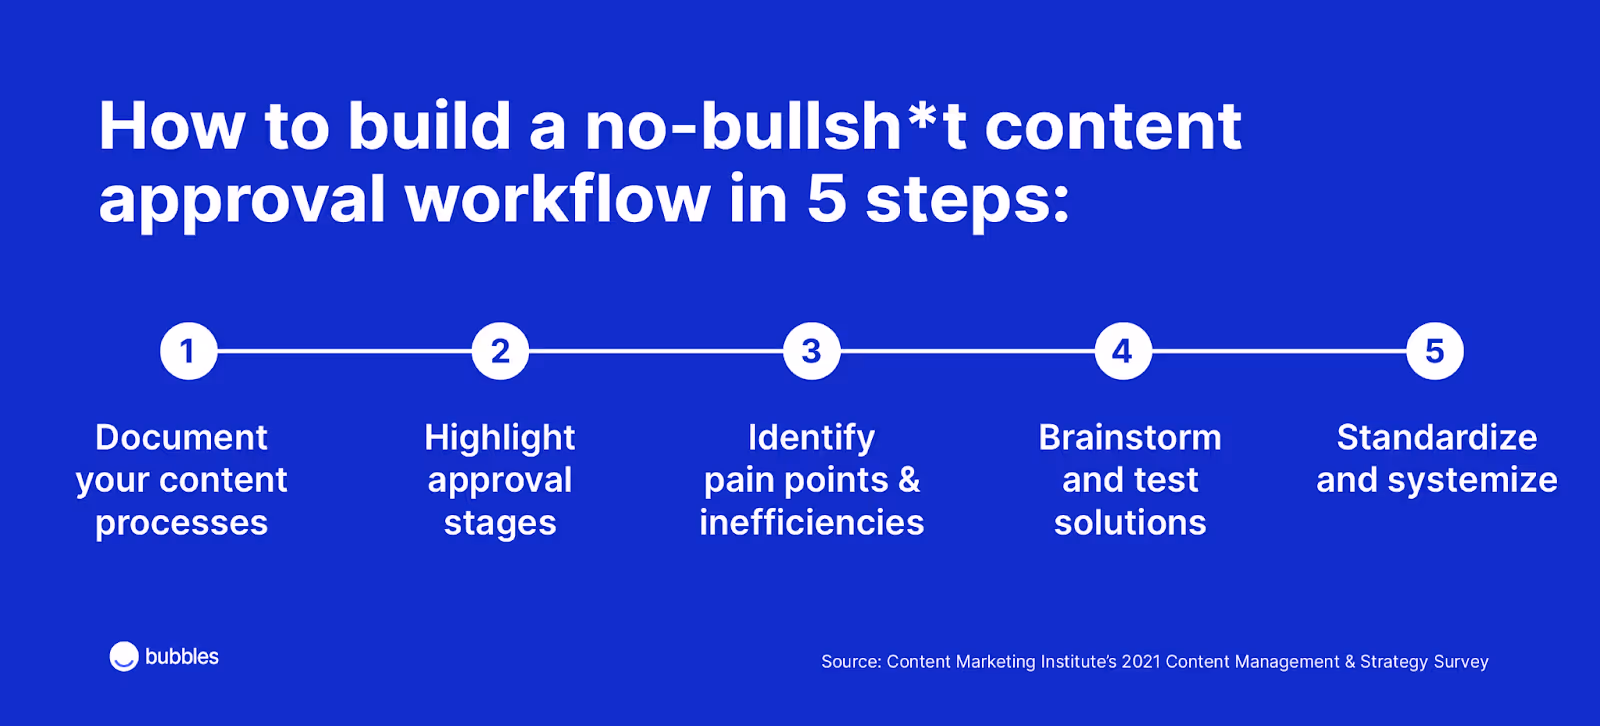
How to build a no-bullsh*t content approval workflow
Content approval workflows don’t have to be complicated. Below, we’ve broken down how to build an efficient content production process and optimize your approval workflow in five simple steps.
Step 1: Document your content production process
The first step to building efficient, repeatable “standard operating procedures” (or SOPs) is defining what your workflow typically looks like. What are the — often unspoken — rules that govern your content creation and approval processes? And what are the exceptions to these “rules”?
The exception often proves the rule, so looking at projects that went totally off the rails can be helpful in defining what the standard workflow should look like.
Start by mapping out what your content production workflow looks like for each type of content you produce — e.g. blog posts, infographics, pitch decks, website landing pages, social media campaigns, videos, etc.
For each type of content asset, answer these questions:
- What are all the steps typically involved in producing this piece of content from idea to execution?
- Who/which role is responsible for each step? (e.g. content strategists, SEOs, copywriters, graphic designers, editors, subject matter experts, content managers, video editors, social media managers, etc.)
- In which order do these steps need to take place?
- Are there occasions when steps are repeated (e.g. multiple rounds of revisions)?
Draw it all out on a whiteboard or notebook until you’re sure you’ve covered all the steps.
Next, get specific about your “typical operating procedures.” Refine your content production workflow by focusing on the specific details that keep things moving.
For each step you’ve outlined, add the following information:
- How long does it typically take to complete this step?
- Which tool(s) will be used to complete this step?
- How is a step’s completion signaled to the next collaborator in the workflow?
- Which digital asset management conventions will be used? (Naming and version control, file location, access control, etc.)
- Are there resources like brand guidelines, style guides, playbooks, briefs, templates, or other content assets that need to be made available? Where do they live?
Step 2: Zoom in on the content approval steps in your workflows
Identify and mark all the steps in each content asset’s production workflow where someone needs to review content, provide feedback, or sign off.
Again, pay attention to the people, processes, and tools involved.
Ask yourself:
- Who is responsible for reviewing, approving, and publishing content?
- What does the review involve? Do you need a rubric to guide the reviewer?
- Are the review and approval stages internal and/or external?
- How will you handle communication around handovers, revisions, and approval?
- Which tool(s) will you use to conduct reviews and provide feedback?

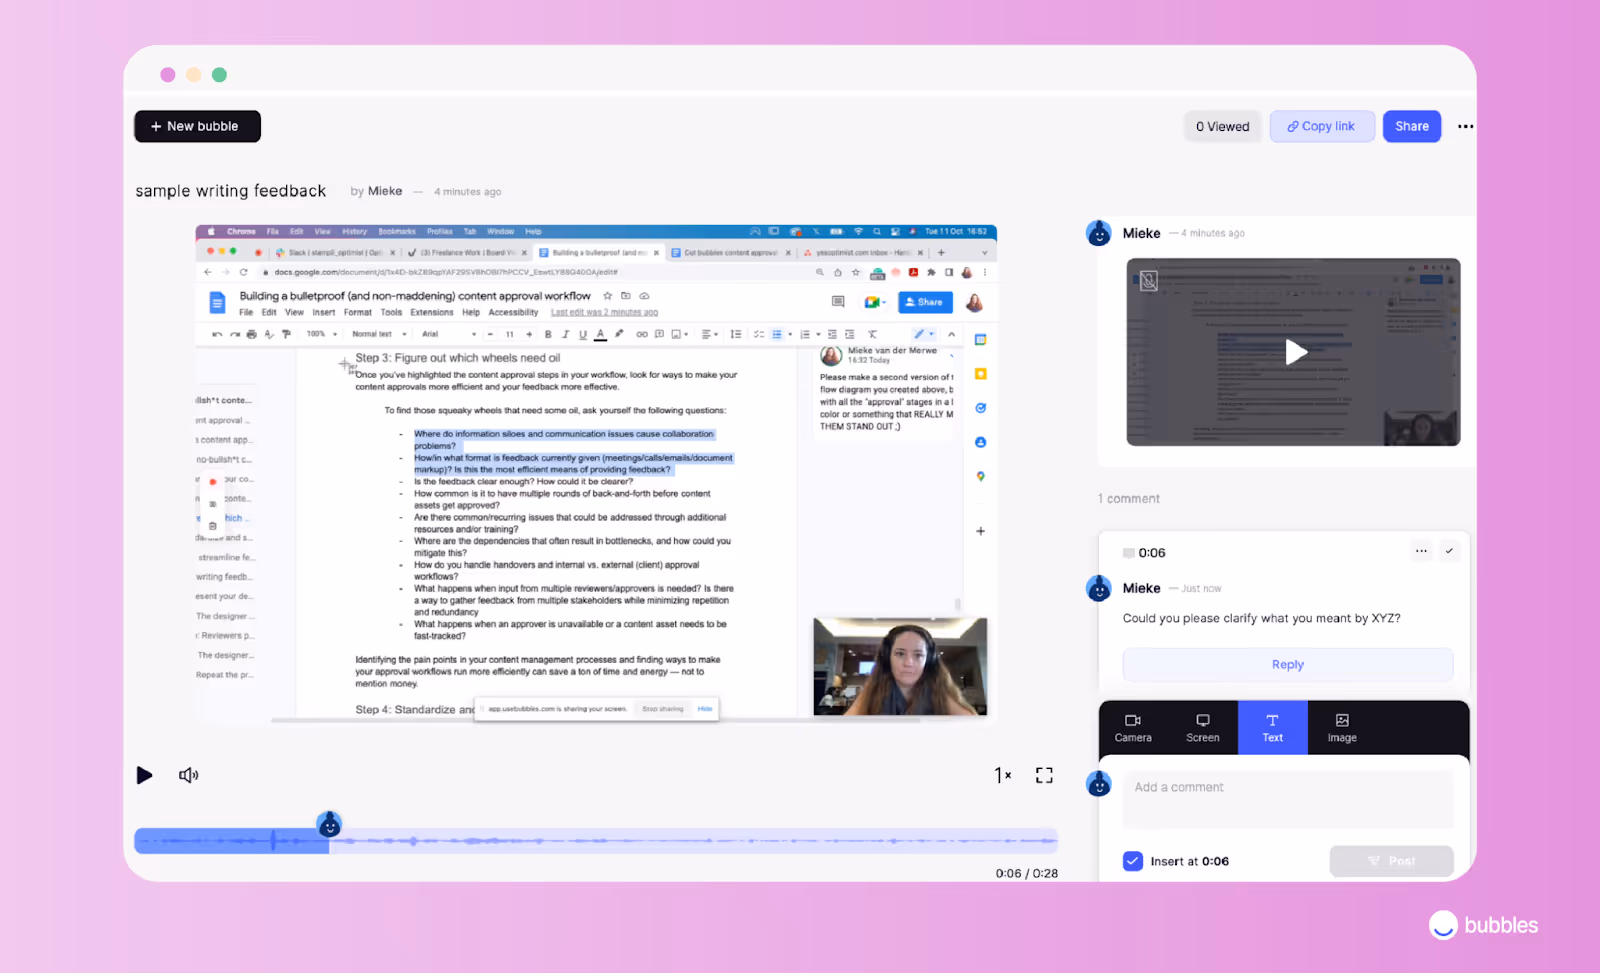
Step 3: Figure out which wheels need oil
Once you’ve highlighted the content approval steps in your workflow, look for ways to make your content approvals more efficient and your feedback more effective.
To find those squeaky wheels that need some oil, ask yourself the following questions:
- Where do information siloes and communication issues cause collaboration problems?
- How/in what format is feedback currently given (meetings/calls/emails/document markup)? Is this the most efficient means of providing feedback?
- Is it common to have multiple rounds of back-and-forth before content gets approved? Could any recurring issues be addressed through training or resources?
- Where are the dependencies that often result in bottlenecks, and how could you mitigate this?
- What happens when input from multiple reviewers/approvers is needed? Is there a way to gather feedback from multiple stakeholders while minimizing repetition?
Identifying the pain points in your content management processes and finding ways to make your approval workflows run more efficiently can save a ton of time and energy — not to mention money.
Step 4: Brainstorm and test solutions
Once you’ve identified the pain points, silos, and bottlenecks in your content approval processes, it’s time to brainstorm ways to address these obstacles with your content team.
Some obstacles might be overcome by using better tools, whether it’s project management tools with automated handover notifications, content management software with built-in rules and role-restricted permissions or tools that allow you to give detailed and contextualized feedback more effectively.
Other obstacles might be addressed by investing time in creating better briefs, templates, style guides, brand identity documentation, content playbooks, communication protocols, and other resources to ensure that everyone’s playing by the same rules.
Next, test out which solutions work and which ones don’t quite fit into your workflows. Keep iterating and improving until you find a workflow that works for your team.
Step 5: Standardize and systemize your approval workflows
By this step, you should have a pretty good idea of what works and what doesn’t. Now it’s time to use the knowledge you’ve gained of what your ideal content workflow looks like and create guidelines to standardize your content creation processes from start to finish.
In order to standardize your content workflows, you need to systemize them.
As we mentioned earlier, efficient content approval workflows begin with effective content creation procedures, i.e. detailed briefs, standard operating procedures, clearly-defined roles and responsibilities, and robust resources and guidelines documenting important information like brand messaging and style preferences.
Use bubbles to streamline feedback and content approvals
Giving text-based feedback can be time-consuming and communicating complex feedback points can be difficult to pull off without ending up writing half the content yourself.
Plus, it can be pretty disheartening to be on the receiving end of a wall of long and detailed feedback comments.
But on the other hand, simply making edits yourself means the content creator doesn’t necessarily understand why you made the changes you did, which means they don’t learn in the process (and you’ll likely end up making the same edits over and over again).
Using a tool like bubbles — which lets you rapidly create screen recordings and give detailed, contextualized feedback — is a game changer for making your content approval workflows more effective and efficient.
Screen recordings allow you to concisely explain the reasoning behind your edits, so writers learn in the process, so you don’t have to make the same edits time and again.
Below, we’ve provided a walkthrough of how you can use bubbles to give feedback to a writer.
How to give feedback to a writer using bubbles’ free screen recording tool
Step 1: Present your feedback in context via a bubbles screen recording
Using bubbles’ free screen recording tool, the reviewer, editor, or content manager records their feedback.
To do so, simply go to the bubbles website and hit “Get bubbles” or install the free Chrome extension and click the bubble icon to open a new bubble.
Next, you’ll select “Screen recording,” set up your microphone, and select whether or not you want to also record a video of your face.

Bubbles’ simple user interface makes it quick and easy to get started.
With your settings configured, you can hit “Start recording.”
Next, you’ll quickly pick what you want to share — your entire screen, a window, or a specific Chrome tab — by clicking on it, and then hitting “Share.”
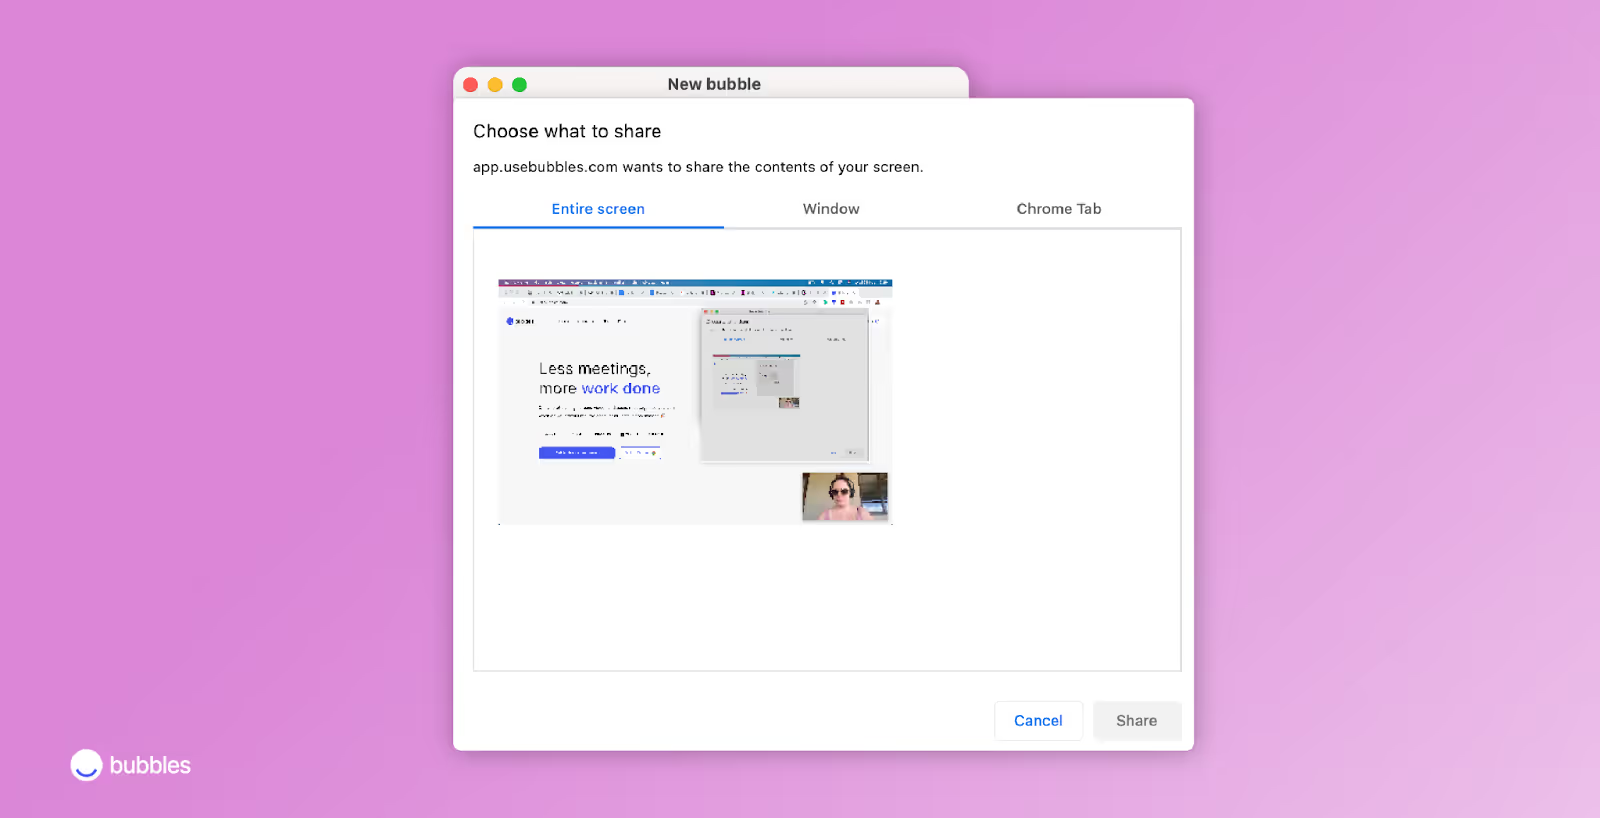
Bubbles lets you control exactly how much of your screen you share.
It’s that easy. Now you’re ready to present your feedback.
You can pause and restart the recording if you need to, or trash it altogether and start over. Pro-tip, it’s good to record (and delete) a test run to help quell any nervousness you might be feeling.
With bubbles, you can elaborate on your suggestions and edits in context, without having to type up a storm.
When you’re done presenting, you’ll simply hit “stop sharing,” and name your bubble something like “Content Approval Blog Feedback.” You’ll be prompted to register, which takes about two seconds — simply provide your name and email address.
Step two: The reviewer or editor shares the bubble with the writer
The content reviewer can now share the link to the bubble of their feedback with the content creator to review.
Step three: The writer views the bubble and responds to feedback
The writer can view the bubble at their convenience by clicking on the link (they don’t need to create an account first!) and can annotate comments or questions to the screen recording. These time-stamped comments can be text-based, voice recordings, or screen-recording videos. This enables a two-way feedback conversation that makes it much easier to get everyone on the same page.
Plus, when multiple people review the same piece of content, reviewers can provide all their feedback in one bubble and view and engage with one another’s feedback, reducing redundancy and repetition.
Bubbles makes it possible to have asynchronous discussions and solve creative problems in context, no matter where team members are located or what timezone they’re in.
Step four: The writer resolves action items
Once any questions are resolved, the writer can get to work resolving the edits and feedback.
Step five: Repeat the process until the content is finalized
Once they feel that they’ve addressed all the feedback, the writer can record and share a walkthrough of the content piece, pointing out all the changes they’ve made. The reviewer (or team) can leave more comments, etc. until the content received final approval.
Bubbles facilitates seamless asynchronous collaboration, making it a powerful tool for improving your content approval process.
Why not try bubbles? It’s free, forever.
Make your
meetings matter
Loved and trusted by 100,000+ users:
- Automatically Record and Transcribe Meetings
- Extremely Accurate Notes, Summaries, and Action Items powered by AI
- Works with Zoom, Google Meet, and Microsoft Teams
- Save time and follow-up with quick async videos
Simply connect your work Google or Microsoft Calendar to get started.

Collaborate better with your team
Get your point across using screen, video, and audio messages. Bubbles is free, and offers unlimited recordings with a click of a button.
.avif)


Collaborate better with your team
Get your point across using screen, video, and audio messages. Bubbles is free, and offers unlimited recordings with a click of a button.

.avif)